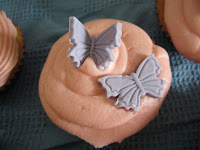
There's not much to say here - It's a standard cake mix divided into cake cases (purple, naturally), baked, cooled and decorated.
Somehow I've managed to achieve cakes with a completely flat top. I doubt I could do it again ;-)
Here are the cutters; plunger butterflies. They both cut out and emboss details on the shapes.
Available from that popular online auction site. Or Lakeland. Or other places.
So... what did I do? This was a while ago. (Terrible blogger that I am...)
Ok. Ummm.. Butter cream icing! And pink food colouring!
175g (6 oz) icing sugar, a few drops of vanillla essence and milk)
When it's a nice smooth consistency place some in an icing bag with a star tipped nozzle (I do prefer the round tip, but I can't face piping chocolate with it!)
Squeeze the icing onto the cake top in a spiral motion. Twirl the cake, twirl the bag, twirl both - whichever's easier.


Messy messy!!
Next up are the butterflies (actually, this is out of order. I made the butterflies while the cakes were baking, as they need to harden slightly)
Tint up some roll out icing. One batch with red gel, one batch with red and blue gel.
Knead thoroughly until evenly coloured. (huh. where's that photo gone? it was there a minute ago!)
Roll out onto a smooth surface, dusted with icing sugar. Dust a rolling pin and begin rolling the icing out, turning regularly and re-dusting where necessary.
Roll to about 2mm thick.
Using the plunger cut out a shape, then stamp the plunger down to emboss the wings.
I made a selection of flat and three-dimensional butterflies.
(for the 3D ones concertina a stiff piece of paper and lay it out. Gently bend each butterfly down its centre and place in a V. I found it easier to lay the butterfly in the V first, then poke it into place with an icing stick.)


You'll need to attach the butterflies before the cake icing fully sets.


.JPG)
.JPG)
.JPG)
.JPG)
.JPG)


.JPG)
.JPG)
.JPG)


No comments:
Post a Comment