Sunday, 25 November 2012

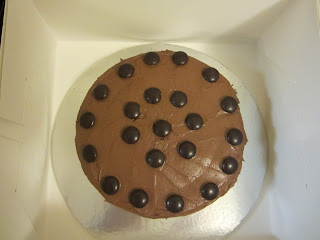
Rum and Cola Chocolate Cake


This was the first time I'd ever made one of these - It's a James Martin recipe... you know that means it's not going to be good for you!
There were several steps for making this - I don't have any photos of these yet, I was a bit rushed to get the bits together at the right time, but now I know what I'm doing (ha!) I should get some progress shots up next time I attempt it!

Rum and Cola Chocolate Cake

Ingredients

9oz self-raising flour
1oz cocoa powder
10.5 oz golden caster sugar
1tsp bicarbonate of soda
2 eggs - beaten
9oz butter (I've made this twice now, and I found that marg worked better for me)
250ml cola (I guess you could use Diet, but this is a James recipe, after all...)
125ml milk
1tsp vanilla extract

(If you're wondering why I switch between imperial weights and metric liquids, it's because my measuring jug starts its imperial scale at 5 floz, which is no good for a recipe that requires 4.5 floz of milk!)

I've found at least 3 different versions of the same recipe - they seem to vary the ratio of cola and milk, and  watching James on youtube, it looks fairly flexible!


 Heat oven to 180oC 

Sift the flour, sugar, cocoa and bicarbonate of soda together into a bowl.

Melt the butter and cola gently in a pan (don't bring it to a boil! It will go everywhere!)

Mix the milk, eggs and vanilla together, and mix into the dry ingredients, before adding the cola/butter mix.
Whisk gently.

Tip the mix into a greased and lined loose-based 9inch cake tin (I notice that James doesn't line his tin, but this is such a wet mix that I found it just poured straight out of the bottom of the tin)

Bake for 40-50 minutes until a skewer inserted into the centre of the cake comes out clean.

 Allow the cake to cool in the tin before removing, and placing on a cooling rack in order to remove the lining paper.

Make up a gananche to top the cake

8oz dark chocolate, broken into pieces
1oz marg
75 ml (5 tbsp ) single cream
2 tsp rum flavouring

Melt the marg into the cream in a saucepan, heat gently, but don't boil the mix.

Remove from the heat, add the rum flavouring, and the chocolate.

Stir until completely mixed and glossy.

Spread the mix over the cake.


This cake is quite delicious... extremely rich, and moist and rather more-ish!

And I've been asked to make one for a Christening!


Monday, 12 November 2012

Halloween Sponge Cake


Here's the shiny cake I made for Halloween (it would've been posted sooner, but... well... I'm very lazy)

Excuse the mess!
-Start with the standard sponge mix
       (for the 3 layer, 8" cake - 6 eggs: 12oz caster sugar: 12oz marg: 12 oz SR flour: 2 tsp vanilla essence,  divided into 3 cake tins)

-Bake for 30-40 minutes at 180oC until a skewer comes out clean. Leave to cool on wire racks.

-Layer up the cake with a fruity jam. Make sure the top layer is upside down so that the flat base of the cake is on the top. This makes it easier to decorate.


-Mix up a butter cream icing and flavour with a little vanilla.
-Apply two layers of butter cream to the entire cake for a nice smooth surface to ice.
-Applying two layers means that any loose crumbs are trapped in the first layer, and the second layer is lovely and smooth!


-Refrigerate between layers - just to firm up before starting on the next one!


What I really wanted to do with this recipe was play with ready roll icing and pretty colours! (I'd found some Halloween coloured icing in Home Bargains...)

Now... *apparently* icing a 3 layer 8" cake like this will require a kilogram of icing. That's quite a lot...

Anyway...

-To make a pale purple base mix 1kg of white icing with 100g of ready coloured purple icing. Cut the icing into 4 or 5 small blocks to make kneading the two colours easier. Knead the smaller pieces back together.

What I have here is a purple marble effect. That should look suitably spooky...

See?


-Dust the surface and the rolling pin with icing sugar
-Roll out to between 3 and 4mm. Turning frequently, and redusting as required.


-You should aim for a rough circle of icing of about 18inches in diameter (Diameter + height + height + waste)

This is a huge amount of icing. As you will see in a bit... 

- Using both arms (not just your hands... this is a mighty swath of icing, after all) lift the rolled out icing and gently drape over the cake


hmmm. That is *quite* a lot of wastage...

-Using the flat of your hand very gently tap the icing to the sides of the cake, starting at the top and working round in a spiral-ish manner.

That really *is* a lot of wastage!
-Smooth the icing on to the sides of the cake, and firmly tap it to the base.


It's like a ghost cake!

-Take a sharp knife and trim away the excess icing


-To embellish the cake, roll out coloured icing (these were more of the Halloween ready-coloured pack) and cut out appropriately spooky shapes
-Mix up a little edible glue (about 2 tsp of the roll out icing, made liquid with 4 tsp water) and stick the shapes onto the cake.


I've brushed a little edible glitter over this, just for a bit of sparkle...


Here's the cake in its travelling box...


And here's the cake at its destination!


I can't remember where I found the information about ho much icing I would need to decorate an 8" cake. It was on-line somewhere. But they said a kilogram. So that's what I used (actually, it was 1.1kg after I'd mixed in the purple icing). I weighed what I had left over. It was about 700g. Which means that I used about 400g on the cake. Which is quite a lot less than a kilogram...

So I've now sealed the rest in clingfilm, and intend to use it on another cake. Another purple cake...

Sunday, 11 November 2012

Sunday Sweets: Fudge

This is *supposed* to be a really simple recipe... This was my second attempt after ruining a saucepan the first time!!

I changed the recipe for the second batch. I also made a small batch since I no longer have a large enough saucepan to make lots!

This is what I used:

150ml evaporated milk
175g granulated sugar
50g margarine
1 tsp vanilla essence

-Start by greasing a 7inch square baking tin, and lining with a strip of greaseproof paper (this will make it easy to lift the fudge out later)
-Heat the evaporated milk, sugar and margarine in a large heavy based saucepan, until the sugar has dissolved and the marg has melted. Stir to combine.


-Bring the mixture to the boil and boil for 15-20 minutes, stirring all the time to prevent the sugar burning on the bottom of the pan. This stage is quite dramatic and bubbly. Watch out for splashing, this sugar is rather hot!


-When the mix reaches 116oC on a sugar thermometer (the soft ball stage) remove from the heat - keep stirring vigorously so the sugar doesn't catch on the bottom... let cool slightly and add the vanilla and stir again.


 -Leave to cool for 5 - 10 minutes

-(here's where the hard work begins) Beat the mixture with a wooden spoon until it thickens and loses its shine


-Pour the mix into the tin, and flatten with a spatula. Leave to set at room temperature.


 -Once set cut into chunks, and store in an airtight container


Saturday, 10 November 2012

Checkerboard Cake

I was trawling through Amazon recently, when I came across this magnificent looking beast of a cake tin:


 You can buy it here. If you want. I guess...

I was mighty tempted by this - but I am highly skeptical that it would actually work as well as they've shown. For a start, when you pull out the divider from each tin won't it start to mix?You'd never get those nice straight lines, would you? And that looks like the devil to fill with cake mix. Look that those retaining arms on the divider. Hmmm. I'm not convinced.

So I decided to make my own. I did plan on buying large cookie cutters to make it nice and easy, but thought I'd try it free hand to see if the concept would work. Anyway... This is what happened.

-Start with a traditional sponge mix - 4 eggs: 8oz caster sugar: 8oz marg: 8oz SR flour: 2tsp vanilla extract
making up the recipe as usual. (Oh, and you'll need butter cream icing. Lots of it...)
-Divide the mix into two, putting half the vanilla mix into a lined cake tin, and mixing an additional 1tbsp cocoa powder and 1 tbsp milk to the remaining batter before pouring that into a second lined cake tin.
-Bake at 180oC for 40 minutes (or so) until cooked.
-Allow to rest for 10 minutes before placing on a wire rack to cool completely


-Find the centres of the cakes, and mark with a cocktail stick


-Cut a circle out of the middle of the cake - the size of the circle should be one third of the total size of the cake, for example the centre circle of a 9inch tin would be 3inches in diameter. I used an 8inch tin, just to make things difficult...  you could measure accurately using the tape and stick like a pair of compasses. I used a glass of almost the right size to make an indentation on the cake before cutting. Here's where cookie cutters would have been extremely useful!!)


-Cut the cake straight down, and not at an angle.
-Repeat with the second cake, measuring out the second circle with a diameter of two thirds of the total cake size (eg 9inch cake, 6inch circle)


- Carefully separate the circles of cake (the outer cake with be quite floppy, so be gentle with it!), and to make sure it fits, reassemble the bits so that each cake now has alternating rings.


-Trim with a bread knife to level the cake


 -To keep the cake from falling to pieces when sliced, glue the rings of one layer of cake with chocolate butter cream icing (this gets very messy... )


 -Completely cover the top of this layer with more butter cream


-Place the other ring of the next layer onto the top of the cake, and spread with butter cream


-Assemble this layer as before, sandwiching the rings with yet more butter cream


 -Cover the whole cake with (yes...) more butter cream. (I did two layers here - a thin layer to begin with. Leaving to set for at least half an hour before applying the second layer. This makes it easier to get a nice finish - it traps any loose crumbs in the first layer as well)

 -

-Using a palate knife, level off the top, or decorate with swirls, and adorn with chocolates


-mmmm!


And here's what it looks like inside!!


Improvements:
Yes, the checker board cake tin would eliminate the messy sandwiching of the rings. And it wouldn't fall apart when you slice it up... It would also save time with the cutting and re-assembling, but I don't know if it would have as good a result. I've seen some wobbly looking pictures online.
But definitely cookie cutters would help with this. It would make a better fit between the rings (I suffered with gapping. But I filled it with more butter cream, and no one seemed to notice...)

I'll certainly try it again. With more layers! And more colours!


Monday, 15 October 2012

Ninjabread Men!!

Ooooooh. Ninja cookie cutters!!


A-may-zing! Available from play.com, if you're so inclined.

And here's the best recipe I've found so far...

Ingredients:

125g unsalted butter
100g dark muscavado sugaer
4 tbsp golden syrup
325g plain flour
1tsp bicarbonate of soda
2tsp ground ginger (adjust to taste. I put in 4 for fun. These were mighty ninjas after all!)

Method:

  • Preheat oven to 170oC/GM3. Line baking trays with baking parchment.
  • Melt the butter, sugar and golden syrup in a saucepan, stirring occasionally. Remove from heat and allow to cool slightly while you
  • Sieve the flour, bicarb and ginger into a large bowl. 
  • Stir the melted ingredients into the dry ingredients and mix to form a stiff dough.
  • Lightly flour a flat, smooth surface and roll the gingerbread to about 5mm thick.
  • Dip the cutters into flour before cutting into the dough.
  • Arrange the shapes onto the lined baking trays, allowing a little room for spreading.
  • Bake for approx 10 minutes, until light golden brown. Remove from oven, and allow to firm up on the trays for 2 or 3 minutes before placing on a wire rack to cool.
  • Decorate with icing!
If you don't eat them all at once, these apparently last for up to two weeks in an airtight container.

This was my first go at rolling out a hot dough, and it was a peculiar sensation. I did find the dough became harder to work with as it cooled, so work quickly, and try not to reuse the leftovers to often, it just becomes crumbly after a while!

Sunday, 16 September 2012

Better Half Cookies

Half Coated Shortbread-like Cookies!


These are very crumbly, very buttery, and very moreish!


Ingredients:
250g Softened Butter
140g Sugar
1tsp Vanilla extract
1 Egg yolk
300g Plain Flour
200g Melted Dark Chocolate

Method-

Cream the butter and sugar together until light and fluffy


Add the vanilla and the egg yolk and mix well


Sift the flour and mix again.


Using your hands gather the dough into a ball, wrap in clingfilm and chill for an hour


Cut the ball into managable sized pieces and roll out onto well floured greaseproof paper (this makes it easier to lift the shapes up. They will try to stick to the surface!!)


Roll out to slightly thicker than a pound coin.


Cut out shapes, and place onto a greased and lined baking tray.


Bake at 180oC for 15 minutes, or until golden brown.

Leave to set for 5 minutes on the baking tray before removing and allowing to cool on a wire wrack.

When cool, hold the biscuit over the bowl of chocolate and spoon the melted chocolate over one half of each heart, placing back onto a tray lined with greaseproof paper until set. (or a cake tin... what ever you have to hand!)