Saturday, 25 January 2014

Palmiers

Palmiers - also known as Palm Trees, French Hearts and sometimes Elephant Ears (and, according to Wiki, Shoe-Soles and Glasses, but I doubt that...)


Take a sheet of puff pastry (yes... I cheated and used ready-rolled. Not even just ready-made! I had someone else roll it out for me!)

I decided to make three versions, so cut the sheet in three, length ways.

Sprinkle the work top with sugar, and lay the pastry into it. Press down firmly to stick the sugar to it. 
On one sheet I spread mincemeat (the largest, as I had lots of mince meat to use up...), on the second, chocolate spread, and on the final, a mix of cinnamon and demerara sugar.


The rolling bit - 
Start rolling the pastry from one end in a tight spiral, but only as far as the centre of the length. Then start rolling the other end to meet in the middle.

Brush the tiniest amount of water along the join where the rolls meet, just to seal them.

Place on a lined tray and refrigerate for 20 minutes.


Using a very sharp knife, cut the rolls into quarter inch slices, and place on a lined baking tray.


Bake in an oven at 190oC for 20mins or until flaky and golden!


Pretty pretty!


Notes -  
Mince meat - Very lumpy with all the fruit in it. Makes it hard to roll tight spirals. They unravelled in the oven. I didn't photograph them, they looked a bit sad. Tasted like mince pies though. 
Chocolate spread - I'd seen online that people thought chocolate spread might be a good idea - I was less than convinced, having cooked it in a toasted sandwich before. I know what happens to baked chocolate spread. It's not pretty... It didn't really work. It kind of separated and burnt! Perhaps grated chocolate mixed with sugar would be better.
Sugar & Cinnamon - worked perfectly - I even placed a slice of apple in the centre of each roll.


Other things that might work quite well -
Savory - green pesto, red pesto, parmesan. Mozerella might be quite fun in the middle...
Any other suggestions?
I shall have a play next time the ready roll puff is on offer!

Tuesday, 21 January 2014

Fruit and Nut Bread


Originally meant to be a recipe to use up over ripe bananas - just to make banana bread... until I found some recipes that used dates (which I had in my fridge from, I dunno, October, probably).So I had to use a recipe that used both.
Then I had to find a recipe that didn't use condensed milk, as apparently that's not one of my cupboard staples this week.

I found a date and banana bread that included walnuts. But I don't like walnuts, so I wouldn't have any of those. I've got cashews, would they work?
Ooooh, what's that? Walnuts? Left over from the same recipe as the dates? How fortuitous!
So, that's slightly over ripe bananas, dates and walnuts to be used? And a recipe that requires slightly over ripe bananas, dates and walnuts?

We are a go!

I'll start off by admitting that I butchered the original recipe. And then I added sultanas. Sorry about that...

Banana Date and Walnut (ish) Loaf:

100g butter
100g caster sugar
1 tsp vanilla extract
2 eggs
225g self-raising flour
1/2 tsp salt
1tsp baking powder
2 over ripe bananas (about 300g)
100g chopped dates
60g chopped walnuts
50g sultanas

Pre-heat the oven to 180oC
Grease and line a 2lb loaf tin.

 Cream the butter and sugar together until pale and fluffy. Add the vanilla and mix well. Incorporate the eggs, one at a time, adding a tablespoon of flour after each one. Mix thoroughly.
Mash the bananas until smooth. Add the banana, sultanas and dates (I'd used dried dates, which I stoned, chopped and very briefly soaked in warm water), stir gently.
Sift the flour, baking powder and salt into the bowl and mix until just combined.

Pour the mixture into the tin, and bake in the middle of the oven for about and hour and a quarter, or until you can poke it with a stick, and the stick come out clean!

Leave to cool in its tin for 10 minutes, then turn out, peel of the lining paper and cool on a wire rack.


Enjoy, sliced, with butter.


Unless it's horrible. In which case I apologise!


Mmmmm. I've just had a nice warm piece with butter melting on top. It was delicious!!

Monday, 13 January 2014

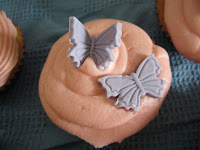
Flutterby cakes

Just an excuse to play with food colouring and butterfly cutters, really!


There's not much to say here - It's a standard cake mix divided into cake cases (purple, naturally), baked, cooled and decorated.
Somehow I've managed to achieve cakes with a completely flat top. I doubt I could do it again ;-)


Here are the cutters; plunger butterflies. They both cut out and emboss details on the shapes.


Available from that popular online auction site. Or Lakeland. Or other places.

So... what did I do? This was a while ago. (Terrible blogger that I am...)
Ok. Ummm.. Butter cream icing! And pink food colouring!


This was made using the instructions on the icing box, and 5 drops of red colouring gel. (75g (3 oz) butter
175g (6 oz) icing sugar, a few drops of vanillla essence and milk)

When it's a nice smooth consistency place some in an icing bag with a star tipped nozzle (I do prefer the round tip, but I can't face piping chocolate with it!)
Squeeze the icing onto the cake top in a spiral motion. Twirl the cake, twirl the bag, twirl both - whichever's easier.


Messy messy!!

Next up are the butterflies (actually, this is out of order. I made the butterflies while the cakes were baking, as they need to harden slightly)
Tint up some roll out icing. One batch with red gel, one batch with red and blue gel.
Knead thoroughly until evenly coloured. (huh. where's that photo gone? it was there a minute ago!)

Roll out onto a smooth surface, dusted with icing sugar. Dust a rolling pin and begin rolling the icing out, turning regularly and re-dusting where necessary.
Roll to about 2mm thick.

Using the plunger cut out a shape, then stamp the plunger down to emboss the wings.
I made a selection of flat and three-dimensional butterflies.

(for the 3D ones concertina a stiff piece of paper and lay it out. Gently bend each butterfly down its centre and place in a V. I found it easier to lay the butterfly in the V first, then poke it into place with an icing stick.)


You'll need to attach the butterflies before the cake icing fully sets.


My Mum's Scones

I have attempted various internet based scone recipes, and have failed miserably in them all (alright... I might not have followed the recipes exactly) But they never come out as well as my mum's.

So here's her recipe (verbatim!)

"I tend to use 8 oz. s.r. flour (and a splosh of baking powder if I have it handy) with 2 oz. margarine. When it's mixed, bung in a couple of tablespoons of sugar (not too much - otherwise it comes out like cake!)  I then mix an egg with some milk and water (and put in a dash of vanilla essence) to make a fairly moist consistency.  Apparently it needs to be fairly moist to make the scones rise properly.  I never roll it out - just gently pat it out onto the worksurface and cut out circles to bake in a fairly hot oven.
As you can tell, I'd never have made a scientist!!"

And they worked!!!

Saturday, 4 January 2014

Quiche

 
To start me off for the year, here's a post with some pictures of quiche. This has been sitting here for months being ignored. (The post... not the quiche. I ate that.)
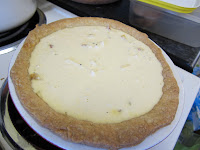
There are two quiches. One Tomato, Basil and Mozerella. One Cheese, Bacon and Onion.
They're both shortcrust pastry - blind baked, and chilled before being filled with the ingredients, and topped with the savoury custard mix (milk, eggs, cheese...)